
So, I finally thought, "Why not string it with two strands of the Flex-rite?". The only problem with that is figuring out how to finish the ends, because it looks bad to fit two cables through the wire guardians...
So, here's what I came up with...
Step 1: String a crimp bead or tube (your choice) onto both strands. Followed by a bead (I used silver, but you can use one of the already strung beads, just take it off before one crimp/tube bead), and then another crimp/tube bead...all onto both strands.

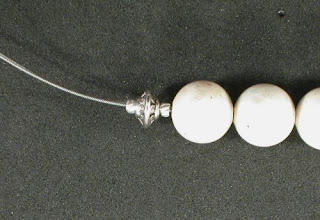
Step 2: Separate the cables, put your wire guardian onto one of them followed by one side of your clasp. Now the next part is tricky because you have to feed the cable that just went through the wire guardian and clasp back through the first crimp/tube, the bead, and second crimp/tube. Don't let the other cable confuse you. You will end up with two cables inside the crimp/tube closest to the clasp, and THREE cables inside the other crimp/tube. Refer to pix.


Step 3: Finally, pull tightly both cables away from each other (this will tighten everything up against the beads), and then squeeze both crimp/tube beads closed (I used just my chain nose pliers, but you are welcome to use your Crimping pliers on the crimp bead, not tube). After you have sqeezed everything nice and snug, cut both ends that are sticking out.


Tada! - You have a finished piece that will hopefully last longer against those hungry silver beads that want to eat your cable!

No comments:
Post a Comment